Crochet Goat Keychain Amigurumi Pattern for Beginners
A round plush face with tiny horns and a sweet stitched nose gives the Crochet Goat Keychain Amigurumi its farmyard charm, ready to hang from a bag, backpack, or set of keys. Its compact shape makes it a satisfying quick make.
Working up a crochet goat keychain pattern takes just an evening thanks to simple increase and decrease rounds built around a single sphere. What makes the amigurumi goat pattern stand out is a reinforced keyring anchor, sewn through several stitches rather than one, so the finished charm survives daily use on a bag or set of keys instead of falling apart within days.
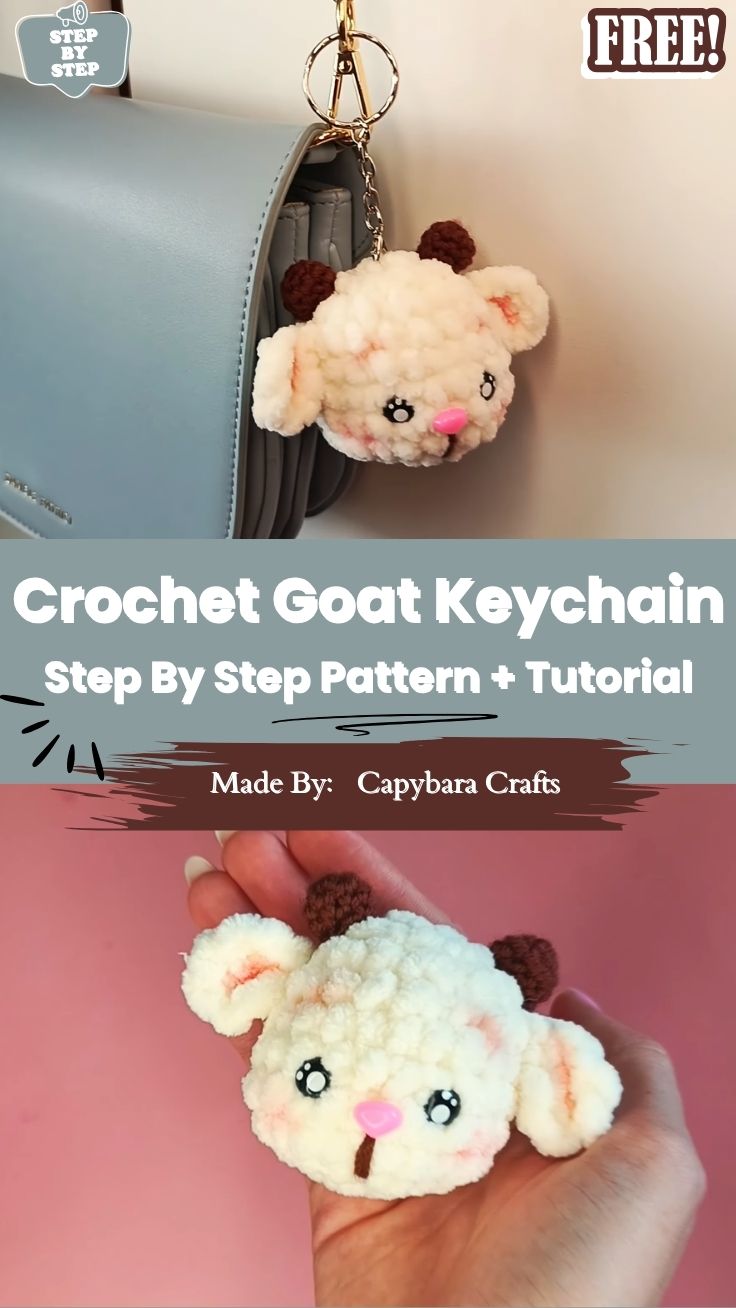
Overview
The goat amigurumi keychain is a head-only design: a small sphere with horns, ears, and a muzzle attached, finished off with a keyring anchored through the top. No body, arms, or legs are involved, so the whole project stitches up quickly and stays manageable as a beginner amigurumi keychain pattern.
Finished Size
Worked in DK or light worsted yarn on a 2.5mm hook, the finished head typically measures around 5cm (2 inches) tall from crown to chin, with a slightly larger footprint once the ears and horns are attached. Tension varies from crocheter to crocheter, so treat this as a typical range rather than an exact promise. Swatching the first two rounds before committing to the full head is the fastest way to confirm your gauge matches.
Skill Level
The easy amigurumi keychain pattern stays beginner-friendly overall, with one step that takes a little more care: anchoring the keychain hardware so it holds up under the weight and friction of actual daily keys.
Materials
- Yarn: DK or light worsted weight in white, cream, brown, or grey for the main color, plus a small amount of black or dark brown for the horns (roughly 5–10 grams is enough for a single keychain of each color used)
- Hook: 2.5mm, adjusted to gauge
- Stuffing: A small handful of polyester fiberfill
- Hardware: A keyring, lobster clasp, or split ring, plus a jump ring if your hardware doesn’t already include a loop
- Other: 6mm safety eyes or black embroidery thread, tapestry needle, stitch markers, sewing needle
Working With Fluffy Yarn
Brushed or faux-fur yarn hides stitch definition, which is useful for covering minor tension inconsistencies at this small scale, but it also hides stitch markers and round transitions, so mark rounds more often than usual. Once assembled, a small pet-slicker brush or fine-tooth comb lightly brushed over the surface opens up the fibers and gives the coat a softer, more finished texture.
Abbreviations
ch = chain, sc = single crochet, inc = increase, dec = decrease, mr = magic ring, sl st = slip stitch, st = stitch, rnd = round
Before You Start
Work tighter than feels natural. At keychain scale, loose stitches let stuffing show through and make a finished piece look unfinished rather than deliberately small; going down one hook size from what you’d normally use for the same yarn weight usually fixes this.
Head
1. Build the sphere
- Rnd 1: 6 sc in magic ring (6)
- Rnd 2: inc in each st around (12)
- Rnd 3: sc, inc around (18)
- Rnd 4: 2 sc, inc around (24)
- Rnd 5: 3 sc, inc around (30)
- Rnd 6: 4 sc, inc around (36)
2. Work the round section
- Rnds 7–10: sc around, no increases (36) these even rounds build the roundness of the head before shaping begins.
Pro Tip: Insert safety eyes between rounds 7 and 8, spacing them evenly on either side of a center-front marker. Placing them a couple of rounds before closing gives enough opening to reach through and secure the backs comfortably.
3. Decrease and stuff
- Rnd 11: 4 sc, dec around (30)
- Rnd 12: 3 sc, dec around (24) — begin stuffing here
- Rnd 13: 2 sc, dec around (18)
- Rnd 14: sc, dec around (12) — add remaining stuffing
- Rnd 15: dec around (6)
Pro Tip: Add stuffing in small pinches every round or two rather than one large handful at the end. Gradual stuffing keeps the shape evenly round instead of lopsided or lumpy on one side.
Fasten off, weave the tail through the remaining 6 stitches, and cinch closed.
Ears (Make 2)
- Rnd 1: 6 sc in magic ring (6)
- Rnd 2: inc in each st around (12)
- Rows 3–5: work flat (turning at the end of each row) in sc, no shaping, for 3 rows
Fasten off, leaving a long tail for sewing. Fold each ear slightly and sew at a downward angle on either side of the head, equal distance from the center-front marker, for a floppy, drooping look.
Horns (Make 2)
- Rnd 1: 5 sc in magic ring (5)
- Rnds 2–5: sc around, no increases (5)
Fasten off, leaving a tail. Leave unstuffed or add a light pinch of stuffing for structure. Curve each horn slightly by pinching the tube as you sew it on, angling both horns backward and very slightly outward. Hold both in place with pins first and check symmetry head-on before sewing permanently.
Muzzle
- Rnd 1: 6 sc in magic ring (6)
- Rnd 2: inc in each st around (12)
- Rnd 3: sc, inc around (18)
Fasten off, leaving a long tail. Sew flat onto the lower third of the face a light pinch of stuffing gives a shallow dome; leaving it unstuffed gives a flatter oval. Embroider two small nostril dots or a simple mouth line beneath it once placed.
Watch The Video Tutorial
If you’d like to follow along visually, this video walkthrough covers
the same steps shown below. It’s a helpful reference if you prefer
watching over reading, but the full written pattern with exact stitch
counts is available right here on this page.
Attaching the Keychain Hardware
Anchoring the hardware is the step generic patterns tend to skip past, and it’s the one that determines whether the finished crochet animal keychain survives being on an actual keyring.
1. Choose the anchor point
Pick a spot at the top center of the head, between where the horns sit.
2. Reinforce the loop
Fold a short length of sturdy yarn or embroidery floss into a loop, then sew through the anchor point multiple times, catching several stitches of the head fabric rather than just one. A loop anchored to a single stitch is the most common point of failure once it’s carrying actual keys.
3. Attach the hardware
Clip on a keyring or lobster clasp directly, or sew a small fabric or ribbon tab through the same anchor points for a tab-style attachment instead of a bare yarn loop.
Pro Tip: Tug the hardware gently in several directions before calling the piece finished. A loop that shifts or pulls at the stitches needs reinforcing now, not after it’s been given as a gift.
Facial Features
Keep eyes level and equidistant from the center-front marker. If working from embroidery rather than safety eyes, place the muzzle first it’s easier to center features around an already-placed muzzle than to fit a muzzle between two eyes that turned out slightly uneven.
Stitch Count Checkpoints
Check that both sides of the head match before adding stuffing. Press the piece flat gently and confirm the round count lines up on either side of the center marker a mismatch is far simpler to fix before stuffing than after.
Common Mistakes & Fixes
- Stuffing shows through: stitches were worked too loosely drop to a smaller hook next time.
- Keyring pulls loose: the loop was sewn through only one or two stitches reinforce with a second pass through more of the surrounding fabric rather than re-tying the same loop.
- Horns point in different directions: they weren’t pinned and compared before sewing remove, re-pin both, and check head-on before committing.
- Overstuffed, distorted head: ease off the stuffing amount and add it in smaller, more frequent pinches.
- Miscounted rounds on fluffy yarn: place extra stitch markers, since brushed yarn hides round transitions more than smooth yarn does.
Color Variations
White-and-brown or grey-and-white are the most goat-recognizable combinations. A solid pastel version reads less literal and works well if the goal is a generic bag charm rather than a realistic farm-animal keychain.
Finishing
If using faux-fur yarn, trim any obviously long or uneven strands after brushing, keeping the horn and muzzle areas closer-cropped than the rest of the head so the facial details stay visible.
Care Instructions
Spot clean only small stuffed pieces with safety eyes and metal hardware shouldn’t go through a washing machine. Keep away from young children given the small hardware and eye components, which present a choking hazard and aren’t appropriate for a baby or toddler toy.
Ways to Use It
Beyond a plain keychain, the finished mini amigurumi keychain works well as a bag charm, backpack clip, or car mirror hang. A small ribbon or bell added near the hardware loop shifts it further toward a decorative charm than a purely functional keychain.
FAQs
Can I use regular yarn instead of faux-fur?
Yes, regular DK or worsted yarn gives a smoother, more classic amigurumi look rather than a textured coat.
Why does my finished piece look lumpy?
Stuffing was likely added unevenly or in one large amount rather than gradually. Small, even pinches every round or two keep the shape round.
Is the goat keychain safe for a child’s toy?
No the small hardware and safety eyes make it unsuitable for young children. It’s designed as a keychain or bag charm for older kids and adults.
How do I stop the keyring from pulling loose?
Anchor it through several stitches of fabric rather than just one, and reinforce with a second pass of stitching before considering the piece finished.
Can I make the keychain bigger or smaller?
Yes, switching to worsted weight yarn with a 3.5mm hook scales the head up noticeably, while working the same round counts in embroidery floss on a 1.5mm hook produces a miniature charm-sized version instead.