Crochet Mosaic Wallet With Two Tone Hearts
This crochet mosaic wallet with two tone hearts feels dense, smooth, and slightly ridged beneath your fingertips. Thin cotton, tight stitches, and raised blue bars frame each golden heart. It is slim enough for pockets and sturdy enough for phones, so patient crocheters end up with a lasting accessory.
Two colors build a woven-looking surface here, and neither strand floats across the back. Each row stacks short beige bars between raised blue ones, and then the hearts rise from a stepped base. Since the crochet mosaic wallet grows in the round, no side seams break the motif. Fine cotton also keeps the fabric firm for daily handling. As a result, this mosaic phone pouch makes a thoughtful keepsake, and the two-color heart clutch carries sentiment well. If you’re new to the craft, this overview of crochet covers the basics.

What You’ll Need for the Crochet Mosaic Wallet
- Fine mercerized cotton thread in sky blue (main shade); the Craft Yarn Council’s yarn weight guide explains thread and yarn weights
- Matching fine cotton in sand beige (contrast shade)
- One 3/0 (2.2 mm) hook with a cushioned grip
- Tapestry needle for weaving in tails
- Sharp scissors
- Stitch marker to flag the start of each round
- A phone or card for checking the fit as the walls rise
A tight tension gives the best structure, so swatch a small square first. If the fabric feels floppy, drop down one hook size.
How Long the Crochet Mosaic Wallet Takes
Plan on roughly six to eight hours of relaxed stitching, and most crocheters finish across two or three sittings. The mosaic rounds take longer than the base, since color changes need steady attention.
Step-by-Step Crochet Mosaic Wallet With Two Tone Hearts
Work through the steps in order, and keep the video open for the chart in Step 5.
Part 1: The Chain and the Oval Base
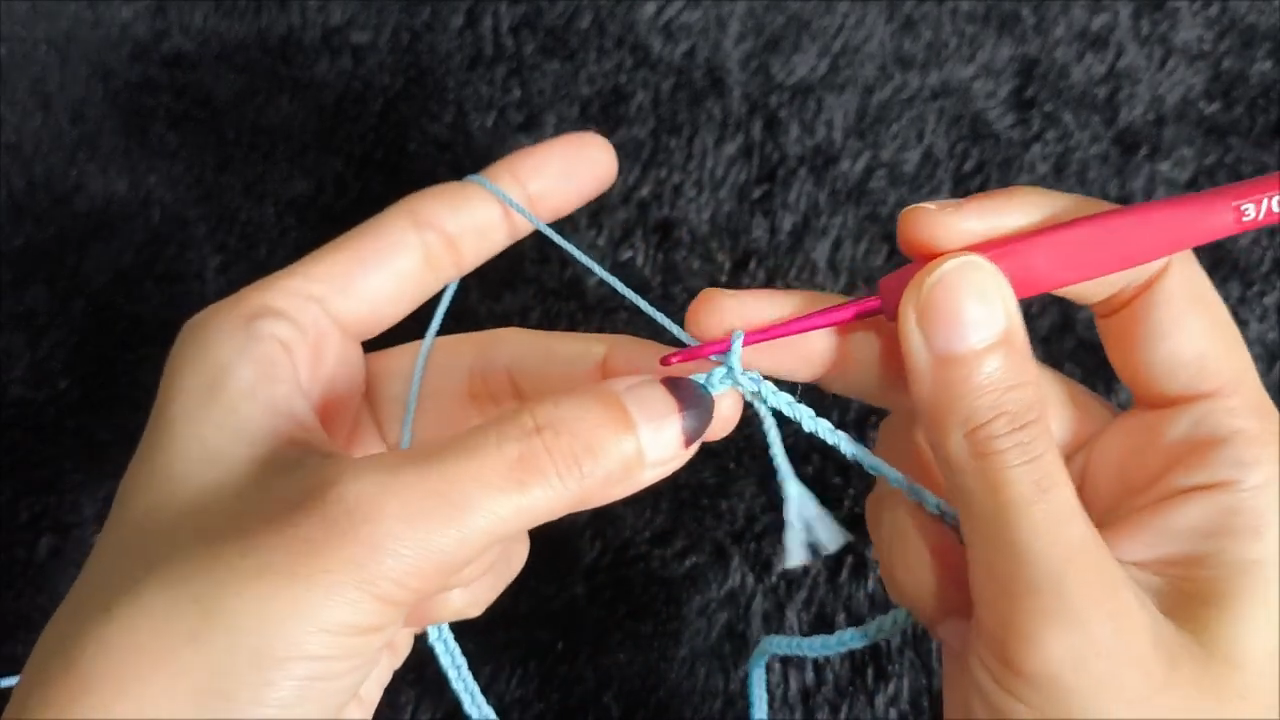
Step 1: Start the foundation chain. First, make a slip knot with the blue cotton and leave a generous tail for weaving later. Then chain a length that matches the width of the item the pouch will hold. Keep the yarn draped over your index finger so every chain stays even.
Step 2: Build the oval base. Next, work along one side of the chain, turn the end, and continue along the opposite side. The base forms a long, flat oval, with blue edges framing a thin beige line through the center.

Step 3: Widen the base with stripes. After that, keep stitching rounds and alternate blue and beige. Leave a loop of the resting color on the hook when pausing, and check that the oval lies flat before moving on.
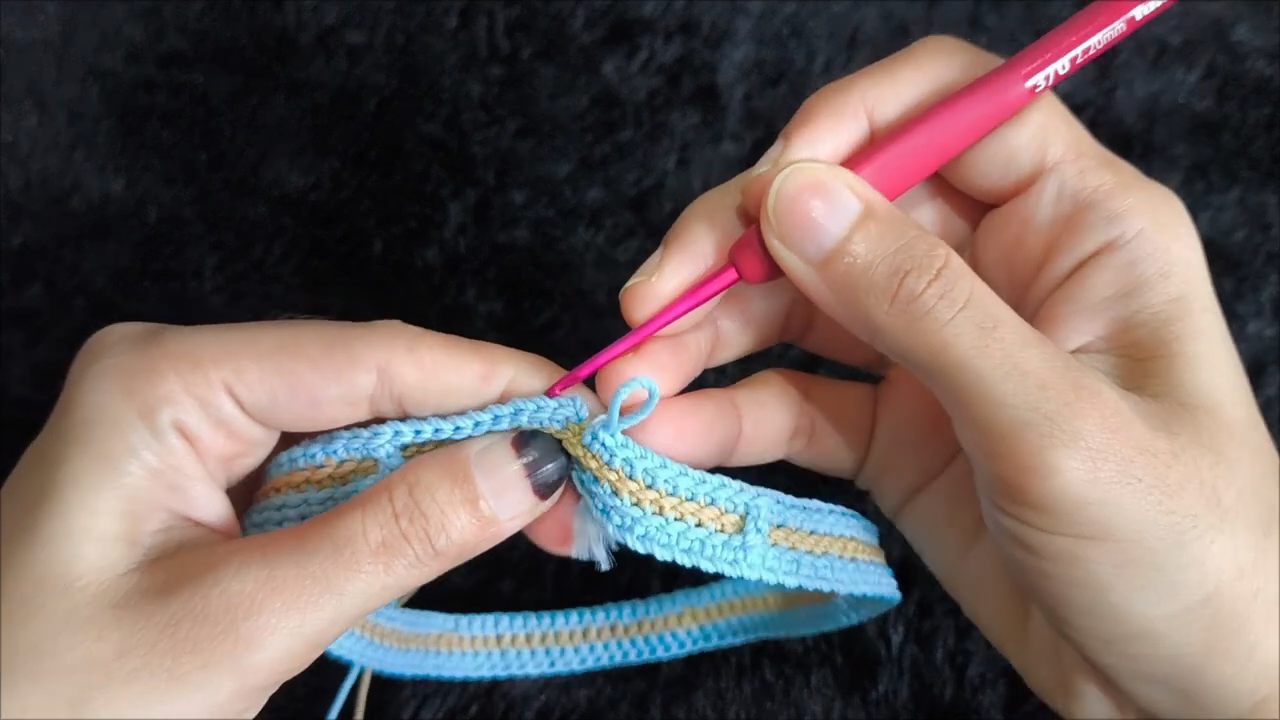
Part 2: The Walls and the Mosaic Rounds
Step 4: Raise the walls. Now continue the rounds so the sides begin to climb from the base edge. Chain up at the start of each round and keep the stripes alternating. Hang the loose tail to the inside, where weaving will hide it later.

Step 5: Begin the mosaic rounds. Hold the beige yarn in your left hand and work beige rounds. Then follow them with blue rounds that bridge over the beige stitches below. Raised blue bars appear and shape the base of each heart. Follow the chart from the video for exact stitch placement.
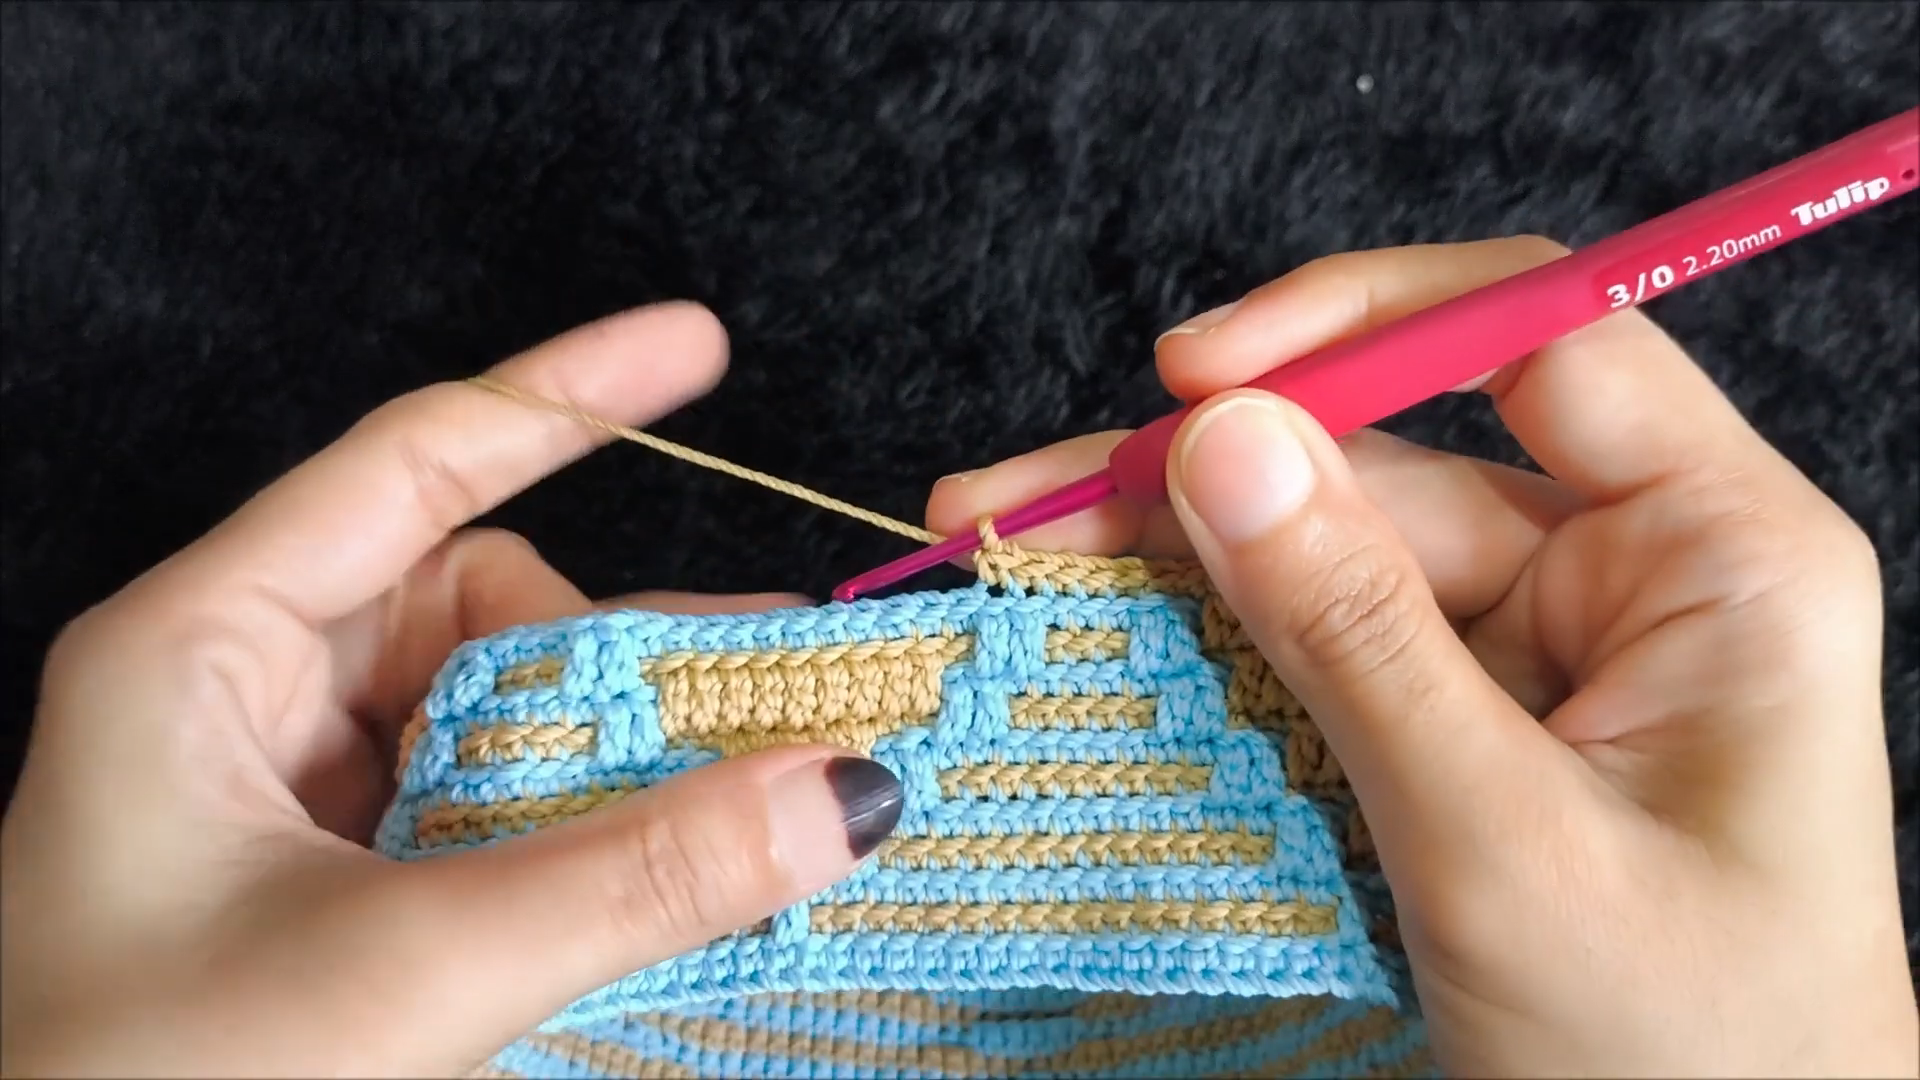
Part 3: The Hearts and the Rim
Step 6: Complete the two hearts. Repeat the chart until both beige hearts sit on the blue background. Count the bars between the hearts so the spacing stays level, and park a blue loop on the hook whenever the work rests.

Step 7: Finish the rim and test the fit. Finally, work plain blue rounds around the top for a smooth, firm edge. Slip stitch to close, fasten off, and weave in all tails. Then slide the phone inside to confirm the opening holds its shape.

Common Mistakes With a Crochet Mosaic Wallet
Problem: The base curls upward.
Fix: Loosen the tension on the first rounds and block the oval flat.
Problem: Hearts look lopsided.
Fix: Recount the bars after every round and use a marker at the heart center.
Problem: Blue and beige bleed into each other.
Fix: Pull the new color up firmly at each change.
Problem: The pouch feels too tight.
Fix: Chain a longer foundation, or use a hook one size larger.
Troubleshooting Your Mosaic Phone Pouch
- Shape sagging: Slip in a stiff card overnight, mist lightly, and air-dry. Our guide to blocking crochet explains the process.
- Uneven fading: Wash the colors together in cool water and keep the piece out of sunlight.
- Loosening rim: Thread a fresh tail through nearby stitches with a needle.
- Stretched opening: Add one tight round of slip stitches in blue along the edge.
Washing and Cleaning Instructions
Hand-wash the crochet mosaic wallet in lukewarm water with a mild soap. Press the fabric gently so suds move through the stitches, and never wring or twist it. Next, rinse until the water runs clear, then roll the pouch in a clean towel to absorb moisture. After that, reshape the corners by hand and lay it flat to air-dry in shade. Avoid bleach, hot water, tumble dryers, and direct sun, since each can fade the blue or warp the heart panels.
Storage Tips for Your Crochet Mosaic Wallet
Store the pouch flat, or lightly stuffed with acid-free tissue, to keep the corners crisp. Choose a breathable cotton bag over plastic, which traps moisture and can cause yellowing. Also keep it in a cool, dark drawer between seasons, and air it gently every few weeks.
Signs of Wear to Watch For
- Fuzzy surface on the blue bars: Trim loose fibers early, since this is only surface wear.
- Thin spots near the opening: Reinforce with a slip-stitch round before holes form.
- Loose tails poking out: Re-weave them right away.
- Stretched rim that no longer closes: Add a fresh edge round, and replace the whole rim only if stitches have split.
- Dull, patchy color: Wash gently and shade-dry. If the color stays uneven, it may be time to remake the piece.
More Projects to Make With This Mosaic Method
The same two-tone mosaic method adapts to other small accessories. For example, a narrower foundation chain gives you a card holder, and a shorter pouch works as a coin purse. Gift-minded stitchers can also pair the wallet with a keychain pouch or make a pencil case for school supplies. For more ideas, browse our crochet coin purse patterns and crochet bag patterns.
Ways to Style or Display Your Crochet Mosaic Wallet
Tuck the pouch into a tote for a pop of color, or clip a small wrist strap to the rim for hands-free carrying. You can also lean it on a shelf with the heart panel facing forward, or drape it over a ceramic dish as a home accent.
Who This Crochet Mosaic Wallet Is Great For
Confident beginners who have tried basic rounds will find the oval base approachable, while intermediate makers who enjoy color work will love the raised bars. Gift crafters, market sellers, and anyone collecting small accessories also benefit from the compact size.
Bonus: Color Swap Ideas
Try dusty rose with cream for a soft look, or navy with mustard for a bolder contrast. Sage and ivory suit a calmer palette. Whichever pair you choose, keep the two shades strongly different in value so the hearts stay sharp.
Bonus: Test the Fit With a Paper Template
Before you chain, cut a piece of paper the size of your phone and fold it around the edges to see how much room you need. Then measure that width and use it to choose your foundation chain length. This quick check helps you avoid a pouch that turns out too snug, and it takes only a minute.
Why This Mosaic Pouch Is Worth Making
Small handmade accessories are quick to finish, and mosaic work looks complex without needing stranded yarn. Hearts are also a lasting favorite for gifting. For these reasons, many makers return to this style:
- Only one color is worked per round.
- A compact size uses little yarn.
- The finished piece suits both daily use and gifting.
Crochet Mosaic Wallet FAQs
Can beginners make a crochet mosaic wallet?
Yes, if basic stitches and color changes feel comfortable. Just start with a practice swatch.
Which yarn works best?
Fine mercerized cotton gives crisp definition and a firm, durable fabric.
How can the pouch size be adjusted?
Change the foundation chain length, or move to a larger or smaller hook.
Does the wallet need lining?
A lining is optional, because tight cotton stitches already hold small items securely.
How should hearts be kept evenly spaced?
Mark the center bar of each heart and recount between repeats.
From First Chain to Finished Rim
Steady tension and a careful chart check carry this project from the first chain to the last stitch of the rim. Take your time with the washing and storage routines, and the colors will stay bright for seasons. Here’s to every heart motif landing exactly where it belongs.