Free Crochet Pink Wallet Pattern With Cash Pockets
Two colors split the work on the wallet in these photos. A long run of rose-pink fabric forms the body and the folded pocket layers, while a bright green section, worked straight off the top edge of the pink, becomes the flap. A single round button sits near the middle of the green panel. The stitches are small and tightly packed, so the fabric has a dense, even grid instead of an open, lacy look.
The Crochet Pink Wallet Pattern below follows the build in the same order the photos show it. You start with a foundation strip, then work flat rows that grow into a wide panel. Folds turn that panel into cash pockets, the color changes to green for the flap, and a button finishes the closure. Each stage explains what to look for and what to check before moving on, so the photos and the video tutorial work together from the first stitch to the button.

What the Finished Wallet Looks Like
The Crochet Pink Wallet Pattern has two main zones, and each one is easy to spot.
The pink body. Most of the wallet is pink fabric worked in straight, even rows. In the later photos, the panel is folded over itself more than once. Those stacked layers are the pockets, and their folded edges run parallel to the rows, so the pocket openings follow the natural line of the stitches.
The green flap. The green section continues from the top of the pink panel, which suggests it is worked onto the existing fabric rather than made separately and sewn on. The stitch texture matches the pink body, so the two colors read as one continuous piece.
The button. A round, light-colored button sits on the green section. The final photo shows it being positioned near the center of the flap’s width.
Nothing in the images shows a lining, zipper, or stiffener. The wallet appears to be made entirely of crochet fabric plus one button. If you’d like a lined, zippered accessory instead, the crochet candy bag pattern covers adding a lining and installing a zipper.
What You’ll Need
These materials are the ones clearly visible in the project photos:
- Pink yarn for the body and pockets
- Green yarn for the flap
- A crochet hook (the photos show a slim metal hook)
- A locking stitch marker (a blue one appears in the photos)
- One round button
Choose a hook that gives you tight, compact stitches with your yarn. The sample fabric shows almost no gaps between stitches, and that density helps the pockets hold paper money without it poking through.
How the Wallet Comes Together
Knowing the overall shape first makes the individual steps easier to follow. The photos show one continuous piece, not several parts joined at the end.
- Foundation strip. A starting length of pink sets the width of the wallet. Every later row stacks on top of it.
- Flat rows. Rows build upward until the pink section is tall enough to fold into pockets.
- Folding and joining. The pink panel is folded to create the pocket layers, and stitches are worked along the edges to hold the folds in place. The stitch marker appears at this stage.
- Color change. Green yarn joins at the top of the pink, and rows continue upward to form the flap.
- Button. The button goes onto the green section to finish the closure.
Keep one thing in mind: the foundation strip controls the width of everything else. If the starting strip is too long or too short, the pockets and the flap inherit the same problem, because they are all built from it.
Step-by-Step Guide
Stitch counts and row numbers come from the video tutorial above. Keep it open alongside the stages below, and use the photos to confirm your fabric looks right at each checkpoint.
Stage 1: Start the Foundation
The first photo shows the pink yarn wrapped over the left index finger for tension, with the hook working the first few stitches right at the fingertips. Steady tension here pays off later. A foundation that tightens and loosens as you go will make the first row wavy, and that waviness carries through the whole panel.
Keep your stitches the same size as you lengthen the strip. If some loops look noticeably bigger than others, pull the working yarn a little snugger before the next stitch.

Stage 2: Build the Starting Strip
In the second photo, the strip has grown into a thick, braided-looking band. The stitches sit tight against each other, and the band stays level rather than twisting.
Before you continue, lay the strip on a flat surface and look along its length. A spiral twist usually means the stitches aren’t all being worked into the same part of the foundation. Fixing it now is far easier than fixing it after several rows are on top.
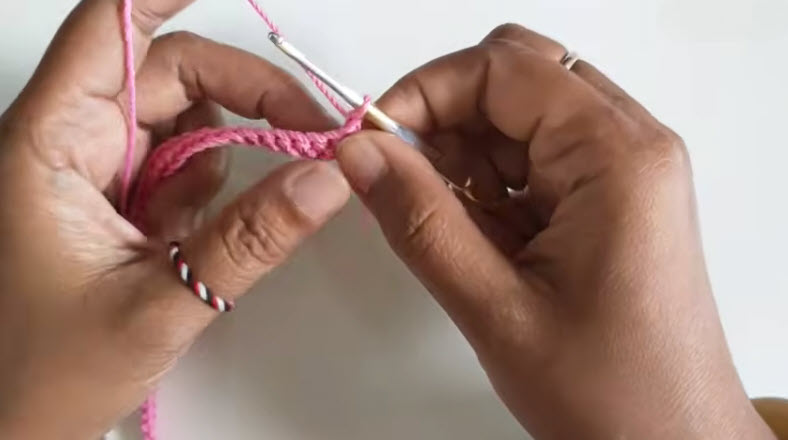
Stage 3: Work the Rows Upward
The third photo shows a long, narrow band a few rows tall, with the finished end curling slightly while the far end is being worked. The rows look even, and the edges run straight, which is exactly what you want.
Watch three things as the rows pile up:
- Edge stitches. Missing the last stitch of a row, or adding an extra one at the start, is the most common way a flat panel slowly turns into a trapezoid. Count at the end of every row, at least for the first several.
- Row height. The fabric in the photos has short, compact rows. If yours come out much taller, your stitches are probably looser than the sample.
- Curl. A little curl at the end of a narrow band is normal, and it should relax as the panel gets taller. If it stays tightly rolled, your tension may be too firm for your hook.
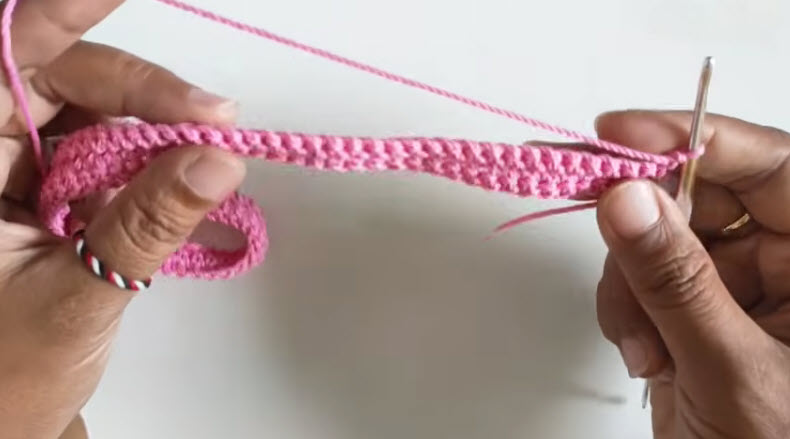
Stage 4: Fold the Panel and Mark Your Place
By the fourth photo, the pink section has become a wide, dense panel, and part of it is folded back on itself. A blue locking stitch marker is clipped at the edge where the hook is working. The folded layer forms one of the pockets.
Use your marker the same way. When stitches are worked through more than one layer, it’s easy to lose track of where a row began or which layer you’re in. A marker at the starting point gives you a fixed reference, and you can move it up as you go.
Before joining through the layers, check that:
- The folded edge sits exactly on a single row line, not diagonally across two
- The side edges of both layers meet evenly
- The fold faces the direction shown in the tutorial

Stage 5: Shape the Pocket Layers
The fifth photo shows the panel with multiple folded layers, which create the cash pockets. The hook is at the upper edge, and the fabric below lies flat without puckering.
Flatness is your best signal here. If the joined area bunches up, the layers are probably different widths, or stitches are being skipped along the edge. Pull out the last few stitches and rework them before going further, because puckering at the join won’t flatten out once the flap is added.

Stage 6: Change to Green for the Flap
In the sixth photo, green yarn has been joined at the top of the pink, and several green rows are already worked. The line between the two colors runs straight across the fabric.
A clean color line depends on making the switch at the right moment. In most flat crochet, you complete the last stitch of the old color by pulling through with the new one, so the new color starts cleanly on the next row. Leave both tails long enough to weave in securely. Wallets get opened and closed constantly, and short tails tend to work loose at exactly those spots.
Keep checking the green rows against the pink. The flap should match the width of the body so the edges line up when it closes.

Stage 7: Add the Button
The final photo shows the button being positioned on the green section, roughly centered across the width of the flap.
Fold the flap closed before you attach anything. Mark where the flap naturally lands, then decide where the button sits relative to that line. Following the video for exact placement keeps your closure matched to the design.
Sew the button on firmly, passing through the fabric several times. Dense crochet grips a button well, but a single pass of thread won’t survive repeated use. For another project that uses a button closure, see how the buttonholes are worked in this simple crochet ladies skirt.

Project-Specific Tips
Count the foundation twice. Every other part of the wallet depends on it. A quick recount before Stage 3 saves you from rebuilding the whole piece.
Stick with one hook for both colors. The pink and green sections should look like one continuous fabric. Swapping hooks at the color change can make the flap noticeably wider or narrower than the body.
Watch your tension on the flap. Many crocheters relax as they near the end of a project, and looser stitches in the green would make the flap stretch and gap. Keep the same grip you used on the pink.
Fold, check, then join. Treat every fold as a pause point. Flatten it with your fingers, look at the edges, and only then work through the layers.
Test the pockets with real cash. Once the pocket layers are joined, slide a folded bill in and out. It should go in without forcing and stay put when you tip the wallet.
Troubleshooting
Pocket Edges Don’t Line Up
What it looks like: One side of a folded pocket sticks out past the other.
What to check: Compare the stitch counts of the rows on each layer, and see whether the fold sits on a single row line.
Possible cause: A dropped or added stitch at a row edge, or a fold made at a slight angle.
Correction: Undo the join, refold along one straight row, and rework the joining stitches. If the counts differ, frog back to the row where they diverged.
The Panel Is Getting Wider or Narrower
What it looks like: The pink body looks like a trapezoid instead of a rectangle.
What to check: The first and last stitches of your recent rows.
Possible cause: Extra stitches worked into the turning space, or the last stitch of a row skipped.
Correction: Rip back to the last correct row, and place a marker in the first and last stitch of each new row until the edges stay steady.
The Flap Won’t Lie Flat
What it looks like: The green section ripples or curls up at the edges.
What to check: The green stitch count compared with the pink width, and your tension compared with the body.
Possible cause: Extra stitches added at the color change, or looser tension in the green rows.
Correction: Match the green row counts to the pink, and redo any loose rows with firmer tension.
The Button Pulls Through
What it looks like: The closure slips open, or the button stretches the fabric where it’s attached.
What to check: How the button was sewn on and whether the fabric around it is dense.
Possible cause: The button is anchored to a single stitch, or it was sewn with too few passes.
Correction: Re-sew the button through more of the fabric, anchoring it across several stitches instead of one.
Checking Fold Alignment Before Joining
The folds decide whether your cash pockets work, so make fold-checking a habit rather than a guess.
Lay the panel flat, right side down, and fold the first pocket layer into position. Run a fingertip along the folded edge. It should follow a single row across the whole width. If your finger drifts up or down a row partway across, the fold is crooked.
Next, look at the two side edges where the layers meet. Clip them together with your stitch marker at the corner where you’ll start joining, then hold the piece up by that corner. If the layers hang evenly, you’re ready. If one layer droops or bunches, readjust it before a single stitch goes in.
Repeat the same check for every fold. It takes under a minute each time, and it’s much faster than undoing a joined seam. The same fold-and-join approach shows up in other small accessories, such as this crochet fairy long-tailed pouch.
FAQs
Is the flap a separate piece?
The photos show the green rows growing directly from the top of the pink panel, so the flap looks like a continuation of the same piece rather than something sewn on later.
How many pockets does the wallet have?
The photos show multiple folded pink layers forming the pockets. Follow the video for the exact number of folds and where each one falls.
Why use a stitch marker on a flat project?
When you work through folded layers, it’s easy to lose your starting point. A locking marker, like the blue one in the photos, holds your place and makes counting more reliable.
Can I swap the colors?
Yes. The pattern’s structure doesn’t depend on color, so you can replace the pink body and green flap with any two shades you like. Use the same yarn type for both sections so the fabric stays even.
Why are my stitches looser than the sample?
The sample fabric is dense, with almost no gaps. If yours looks more open, try a smaller hook or firmer tension, then compare a few rows against the photos again.
Final Notes
The whole wallet depends on one idea: an even, straight panel that folds cleanly. Get the foundation right, keep your edges consistent, and check each fold before joining, and the pockets, flap, and button will fall into place. Keep the video handy for the counts, and use the stage photos as visual checkpoints along the way.