Tiny Crochet Lion Cub Pattern With Fuzzy Mane
A white muzzle no bigger than a fingernail sits on a velvety tan head in this tiny crochet lion cub pattern with a fuzzy mane, framed by a soft halo of brown fur yarn. Fine thread, a steel hook and a few pins bring the whole little face together.
This lion cub is made at micro amigurumi scale in small parts: a round head, a separate oval muzzle, a stuffed body and a mane sewn from fur yarn. You’ll learn how to pin and stitch the muzzle evenly, place the eyes symmetrically, and layer the mane so the face stays visible and neat.

Pattern Overview
The lion is worked in continuous single crochet spirals. The head and body are stuffed firmly, while the muzzle, ears, arms, legs and tail are made separately and sewn on. The mane goes on last, so you can judge the face before the fur hides any edges.
- Finished size: With fine thread and a hook under 1 mm, the head is roughly an inch wide.
- Skill level: Confident beginner. If you’ve made amigurumi in regular yarn, you can manage this. Practice a few rounds in thread first.
- Time: About 20 minutes of prep, 2–3 hours of stitching, and 1.5–2 hours for sewing, the face and the mane
Materials
- Fine tan yarn (micro chenille, velvet thread, or embroidery floss doubled)
- A small amount of white in the same weight
- Brown or taupe fur yarn with a short pile
- 0.6–1.0 mm steel crochet hook
- Two 2–3 mm black beads for eyes, or black floss to embroider them
- Black embroidery floss for the nose
- Sewing needle and thread to match the tan and the mane
- Polyester fiberfill
- Red-head pins, tweezers and sharp scissors
Yarn and Hook
Choose a smooth or velvety fine yarn for the body so the stitches stay defined. Fuzzy body yarn hides the stitches you need to count. Size your hook down until the fabric looks solid, with no stuffing peeking through. Gauge isn’t critical, but every piece must use the same yarn and hook so the proportions match.
Safety
Beads, pins and tiny parts are choking hazards. Treat the finished lion as a display piece or keepsake, not a toy for children under three. Count your pins before and after assembly.
Abbreviations
- MR – magic ring
- ch – chain
- sc – single crochet
- inc – 2 sc in one stitch
- dec – single crochet decrease
- sl st – slip stitch
Watch the Video Tutorial
Working at this size is much easier after you’ve seen it done. The video shows the muzzle, the face shaping and the mane up close.
Step-by-Step Lion Cub Pattern
Marker tip: At micro scale, a strand of contrasting sewing thread works better than a clip marker. Lay it across your first stitch and flip it forward each round.
Step 1: Head (tan)
- R1: 6 sc in MR (6)
- R2: inc x6 (12)
- R3: (sc, inc) x6 (18)
- R4: (2 sc, inc) x6 (24)
- R5–9: sc around (24)
- R10: (2 sc, dec) x6 (18). Stuff firmly.
- R11: (sc, dec) x6 (12)
- R12: dec x6 (6). Close and weave in the end.
Stuff until the head feels firm. A soft head wrinkles when you sew the muzzle on.
Step 2: Muzzle (white)
Ch 4. Starting in the 2nd ch from the hook, sc 2, then 3 sc in the last ch. Working along the other side of the chain, sc 1, then 2 sc in the last ch (8). Sl st and leave a long tail.
Keep your tension snug so the tiny piece holds its curve. Hold it between your fingertips: it should be a smooth, puffy oval. If one end looks pointed, redo it.


Step 3: Body (tan)
- R1: 6 sc in MR (6)
- R2: inc x6 (12)
- R3: (sc, inc) x6 (18)
- R4–8: sc around (18)
- R9: (sc, dec) x6 (12). Stuff.
- R10–11: sc around (12). Leave a tail for sewing to the head.
Step 4: Arms and Legs (make 4, tan)
- R1: 6 sc in MR (6)
- R2–5: sc around (6)
Stuff the legs lightly with tweezers. Leave the arms unstuffed if you’d like a soft, floppy look.
Step 5: Ears (make 2, tan)
R1: 5 sc in MR. Pull the ring only halfway closed to form a small cup. Leave a tail.
Step 6: Tail (tan)
Ch 12, then sl st back along the chain. Knot a few short strands of fur yarn at the tip for the tuft.
Step 7: Pin and Sew the Muzzle
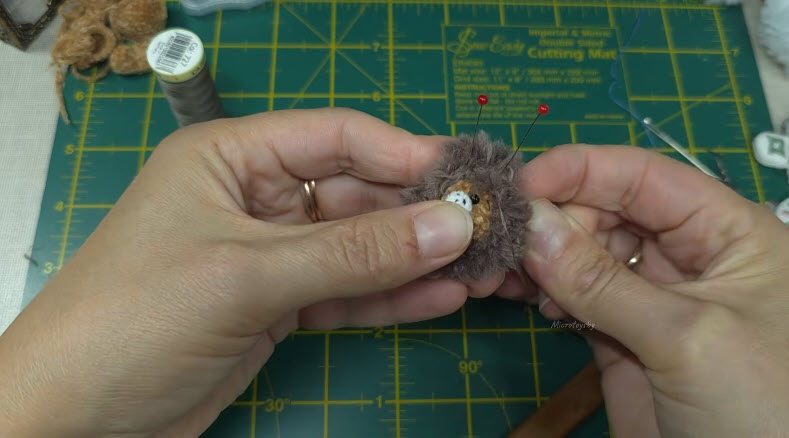
Center the muzzle on the lower half of the head. Push one pin through each side into the stuffing, then check it straight on and from above before sewing.
With a sewing needle and fine white or tan thread, take tiny stitches under the muzzle edge. Tuck a wisp of stuffing inside before the last few stitches so it sits slightly raised.

Step 8: Shape the Eyes and Add the Face
Mark the eye spots just above the muzzle, one on each side of its center line. Measure from the muzzle’s center, not from the edge of the head, so the eyes match.
To give the eyes a soft hollow, pass tan sewing thread from the base of the head up to one eye spot and back down, then repeat for the other. Pull gently so each spot dips inward.

Sew a bead eye into each hollow, pulling the thread slightly tight to settle it in, or embroider the eyes with black floss. Then stitch a small triangle nose in black floss at the top of the muzzle.

Step 9: Attach the Fur Mane
Starting at the edge of the face, sew fur yarn in a spiral around the head with matching sewing thread. Pin a short section, sew it, then move on. Keep the first ring close to the face, so no tan gaps show between the fur and the muzzle. Continue the spiral until the whole back of the head is covered.
Step 10: Join the Body and Finish
Sew the head to the body, then add the arms, legs, ears and tail. Gently brush the mane with a needle tip to lift the pile, and trim any fur that covers the ears or face.

Taming Fur Yarn at Micro Scale
Fur yarn sheds and grips the needle, so cut pieces slightly longer than you need. Sew through the base core of the yarn, not the pile, so the stitches disappear. After each section, stroke the fur away from the face with a needle tip to free any trapped strands. A lint roller nearby keeps your work surface tidy.
Common Mistakes
- Lost stitch count: Skipped stitches hide easily in fine yarn. Count every increase round.
- Understuffed head: The head wrinkles when you sew on the muzzle.
- Uneven eyes: Measure from the muzzle center, not the head edge.
- A mane that’s too thick: Heavy fur buries the ears. Trim the pile around the face.
Troubleshooting
- Stuffing shows through: Use a smaller hook.
- The muzzle sits crooked: Remove a few stitches, re-pin and resew.
- The mane looks patchy: Add a second spiral row between the existing rows.
Size and Color Ideas
Worked in DK yarn with a 2.5 mm hook, the same counts make a lion several times larger. Use safety eyes around 6 mm and a longer-pile fur yarn so the mane stays in proportion.
For color, try a golden head with a rust mane, a cream “white lion” with pale fur, or a pastel version with a lilac mane. A thread-crochet crown or bow, pink floss paw pads, or a felt circle base so the lion stands on a shelf are all sweet finishing touches.
Grow a Tiny Pride: Lioness and Cub Variations
Once you’ve made one maned lion, the same pieces can build a whole little family with only small changes.
- Lioness: Skip the fur mane entirely. Use a slightly lighter golden tan, and sew the ears a little higher on the head.
- Baby cub: Use a finer thread and a smaller hook with the same counts, for a noticeably smaller lion. Leave off the mane, and add a single tuft of fur on top of the head.
- Spotted cub: Real lion cubs have faint spots, so add a few tiny light brown French knots on the body and legs.
- Sleepy face: Embroider closed curved eyes instead of beads for a napping cub.
- Pride display: Arrange the lion, lioness and cubs on a round felt “rock” for a tiny savanna scene.
If you enjoy micro amigurumi, the tiny two-inch crochet horse uses the same fine-thread techniques. For more lion fun at a bigger size, try the lion glasses holder, and add the crochet giraffe amigurumi for a full safari set.
Care Instructions
Spot clean with a damp cloth only. Avoid soaking, because fur yarn mats when wet. Fluff the mane gently with a soft brush.
FAQs
Can a beginner make this lion?
If you’re comfortable with amigurumi in regular yarn, yes. Practice a few rounds with thread first to get used to the small scale.
What if I can’t find fur yarn?
Brushed mohair or looped thread gives a similar fluffy look.
Can I use safety eyes?
At micro scale, beads or embroidered eyes fit much better. Safety eyes suit the larger DK version.
A Pocket-Sized King of the Shelf
A lion small enough to rest on a fingertip takes patience, but every piece is built from simple rounds you already know. Pin before you sew, count every increase, and save the mane for last so the face gets your full attention. Once the tail tuft is brushed out, your little cub is ready to rule a bookshelf, a gift box, or a tiny pride of its own.