Crochet Bauble Baroque Atelier Christmas Ornament
The Crochet Bauble Baroque Atelier pattern brings deep green, bright red, and shimmering gold together in one festive ornament. Worked in rounds with metallic thread, the bauble earns a spot on any tree, and the steps below lead to a clean, ornate result.
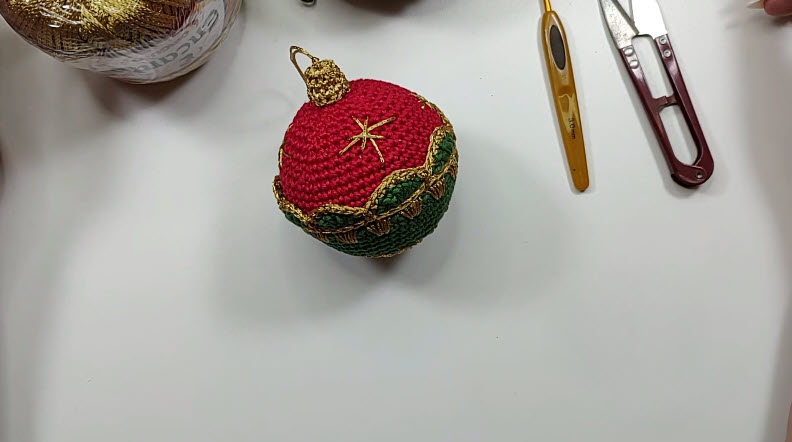
Some ornaments are made to last for decades, and a baroque bauble fits that role well. Ornate gold points climb a green dome, while a red cap crowns the top. As a handmade tree decoration, it carries real heirloom charm. Plus, this gold-accent amigurumi bauble becomes a keepsake families can pass along each December. Every ornament made this way ends up slightly different, which adds to its value.
What You’ll Need for the Crochet Bauble Baroque Atelier
- Fine mercerized cotton or thread in dark green and red
- Metallic gold thread in a matching thickness
- A small steel hook sized to suit the thread (about 1.5 to 2 mm)
- A smooth polystyrene ball, roughly 7 cm across
- A locking stitch marker
- A blunt embroidery needle
- Sharp scissors
- A thin cord or ribbon for the hanging loop
Getting Ready to Start Your Baroque Bauble
Wind each color into a loose ball so the strands never tangle. Metallic thread slips easily, so keep its ball in a small cup. Next, crochet a tiny swatch and check that the fabric feels dense, because gaps will show the foam beneath. If the stitches look loose, drop one hook size. Finally, clip a marker into the first stitch of every round to track your place.
How to Read This Pattern
Each round spirals without joining, so the marker always sits on the first stitch. “Increase” means working two stitches into one, and “decrease” means joining two stitches into one. Color changes happen mid-round, and the unused strand travels along the back or front, depending on the effect you want. Always finish a round before judging the shape, since the fabric relaxes as it grows.
How Long the Crochet Bauble Takes
Plan on three to four hours in total. The green dome takes about ninety minutes, while the gold detailing and red cap need roughly two hours. The embroidery then adds another thirty minutes.
Step-by-Step Crochet Bauble Baroque Atelier Pattern
Work through the steps in order. If the magic ring is new to you, our magic ring tutorial shows it slowly.
Part 1: The Green Base and Dome
Step 1: Start the green base. First, form a magic ring with green thread and work the first small round of single crochet into the ring. Then pull the tail until the center closes tightly.
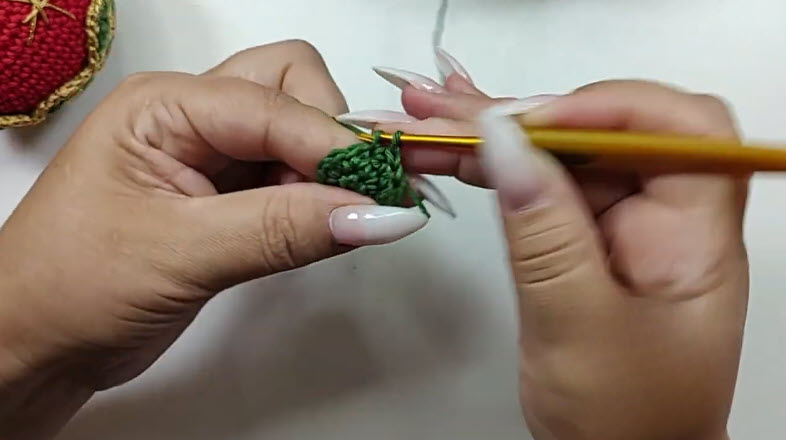
Step 2: Widen the disc. Next, increase evenly in each round so the circle grows flat, and clip the stitch marker into the first stitch of every round. The flat piece will take on a gently six-sided outline.
Stitch check: The disc should lie flat with no ruffling. If the edges wave, an increase went missing. If it cups early, one increase was added too many.

Step 3: Raise the sides. After that, stop increasing and work even rounds, so the edge turns upward into a shallow cup. Bring in the gold thread near the rim, and work a few gold stitches along the edge with the hook inserted through the front of the fabric.
Why it matters: Stopping the increases is what turns a flat circle into a curved dome, so skip nothing here.

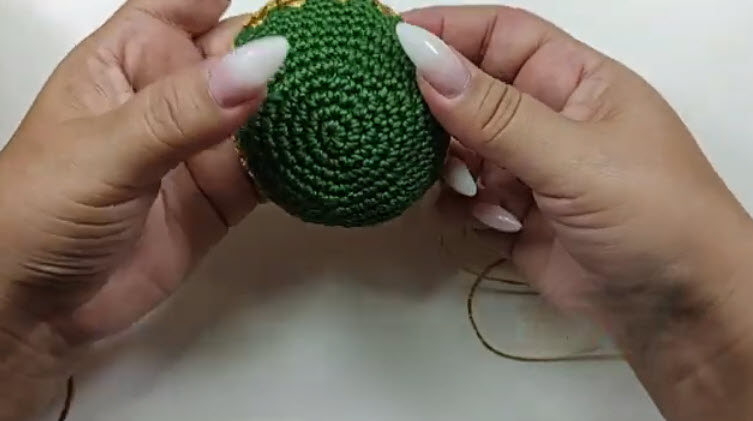
Step 4: Shape the dome. Now return to green and keep working even rounds. The piece deepens into a rounded bowl, and the spiral at the base shows neat, tight stitches. A thin gold edge peeks out from the rim.
Count now: Tally the stitches in the last round. The total should match the final increase round, so correct any slip before moving on.
Part 2: The Gold Points and the Red Band
Step 5: Build the baroque points. Alternate gold and green stitches to form pointed gold scallops. Each point rises from the rim in a repeating wave, and the green fabric frames every gold peak. Keep the gold strand loose enough that it never puckers the dome.
Why it matters: Loose carried strands keep the fabric flexible, so the ornate gold work stays smooth over the ball.

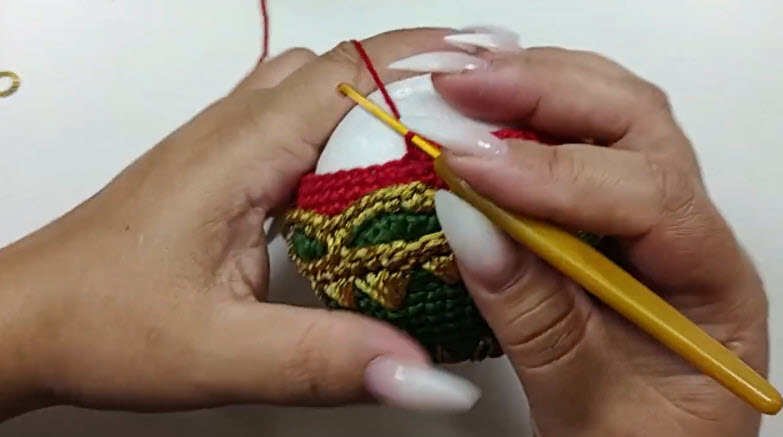
Step 6: Add the red band. Then slide the foam ball inside the dome before the opening narrows. Join red thread above the gold design, and work several rounds in red, decreasing gradually so the fabric hugs the ball.
Shape check: Turn the piece in your hand. The red band should sit evenly around the ball, with no wrinkles near the gold points.
Part 3: The Crown, Cap, and Embroidery
Step 7: Close the red crown. Keep decreasing in red until the opening shrinks to a small dimple, then fasten off and weave in the end. Finally, add a gold border around the lower rim for a crisp, framed edge.
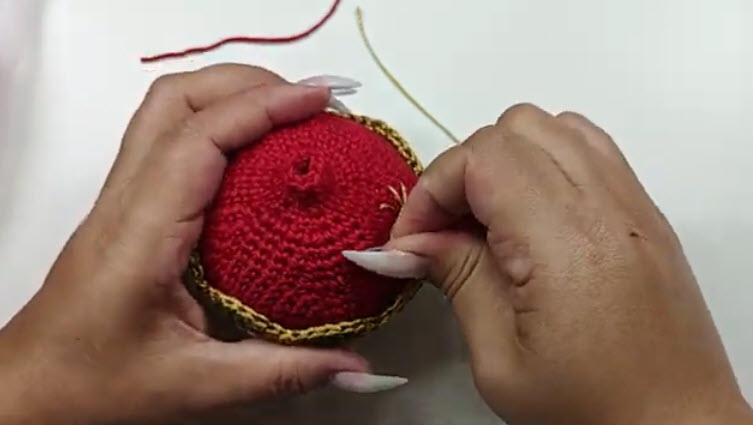
Step 8: Add the gold cap and embroidery. To finish, set a small gold crocheted circle over the crown and stitch it down firmly. Thread the needle with gold and embroider starburst accents across the red surface, then anchor the cord loop beneath the cap.
Stitch check: Every starburst should radiate from one central point with evenly spaced arms.

Signs You Followed the Crochet Bauble Baroque Atelier Pattern Correctly
- The green dome feels firm and rounded with no foam showing.
- Gold points stand upright and look evenly spaced.
- The red cap sits snugly, with a neat dimple at the crown.
- Starburst stitches lie flat against the fabric.
- The hanging loop holds steady when lifted.
Common Mistakes With the Crochet Bauble Baroque Atelier
Problem: Foam peeks through the stitches.
Fix: Switch to a smaller hook, then recrochet the loose rounds.
Problem: The gold points look lopsided.
Fix: Recount the repeat in each round, and pull out back to the last accurate point.
Problem: The red band wrinkles.
Fix: Decrease more slowly, because gentle shaping keeps the fabric smooth.
Problem: Metallic thread twists and kinks.
Fix: Let the ball dangle every few stitches so it can unwind.
Troubleshooting Your Baroque Bauble
Issue: The cap wobbles after assembly.
Fix: Re-stitch around its full edge with an extra pass of thread.
Issue: Gold embroidery sinks into the fabric.
Fix: Lift the strand gently, then tack it down at each arm tip.
Issue: The ornament leans when hung.
Fix: Move the cord anchor closer to the exact crown center.
Issue: The ball shifts inside.
Fix: Add a dot of craft glue through the opening before closing.
Cleaning and Care for Your Crochet Bauble Baroque Atelier
Never soak the ornament, since the foam core cannot get wet. Instead, dab surface dust with a soft, slightly damp cloth, and treat stains with a cotton swab and a drop of mild soap. Let the piece air-dry fully before storage. Then wrap it in tissue paper and keep it in a dry box away from sunlight, which can dull metallic thread.
More Christmas Projects to Make With This Pattern
Readers who enjoy ornate festive pieces can make a set of three in different shades, which looks lovely beside a wreath or garland. The ornament also pairs well with a small handmade gift tag on wrapped presents, and a larger version works as mantel decor. For more ideas, browse our crochet Christmas ornament patterns and crochet Christmas patterns. For general background on the tradition, see this overview of Christmas ornaments.
Who This Crochet Bauble Baroque Atelier Is Great For
Confident beginners who know single crochet and decreasing will manage well, and gift makers will appreciate the polished look. Holiday market sellers will value the low material cost, while collectors of vintage-style decorations will find the baroque styling especially satisfying.
Why the Crochet Bauble Baroque Atelier Is Worth Making
Handmade ornaments feel more personal than mass-produced ones, and they photograph beautifully for seasonal posts. For these reasons, many makers return to this style:
- Rich color pairing suits both classic and modern trees
- Small size means fast progress and low material cost
- Gold detailing makes a simple shape feel luxurious
Bonus: Taming Metallic Thread
Metallic gold thread behaves differently from cotton. Cut shorter working lengths to limit fraying, and seal cut ends with a tiny dab of clear glue. Keep your tension light, since overly tight stitches can snap thin strands. Also, test a small sample first.
Bonus: Turn It Into a Gift Topper
A finished ornament also works as a gift topper. Tie the cord loop around the ribbon of a wrapped box, so the bauble sits right on top. The recipient gets a present and a keepsake in one, because the ornament can move to the tree afterward.
Bonus: Try a New Color Combination
Once you’ve made the classic version, try a second one in a different palette. Deep navy with silver points suits a winter theme, while burgundy with antique gold gives a warmer, vintage look. Keep the same stitch counts and only change the thread, so the baroque shaping stays crisp. A mixed set on one tree looks especially rich.
Crochet Bauble Baroque Atelier FAQs
Can beginners make the Crochet Bauble Baroque Atelier ornament?
Yes, if single crochet and decreasing feel comfortable. The gold points need patience, so work slowly.
What size will the finished ornament be?
It matches the ball inside, roughly 7 cm across. A larger ball gives a larger ornament.
Can another yarn replace the thread?
Fine cotton works best. Thicker yarn, on the other hand, produces a bigger, softer ornament and loses crisp detail.
Do I have to use a foam ball?
Polyester fiberfill works as an alternative. However, a ball gives a smoother, firmer shape.
How do I hang it?
Anchor a cord loop under the gold cap, then knot the ends for a secure hanger.
Gold on the Tree
A finished ornament shows how a few humble stitches can feel grand. Gold and red together carry a timeless holiday warmth, and hand-worked texture adds depth that store-bought baubles lack. Make a few extras this season, and every recipient will receive something made with patience.