Cute Crochet Teddy Bear Amigurumi Pattern Toy
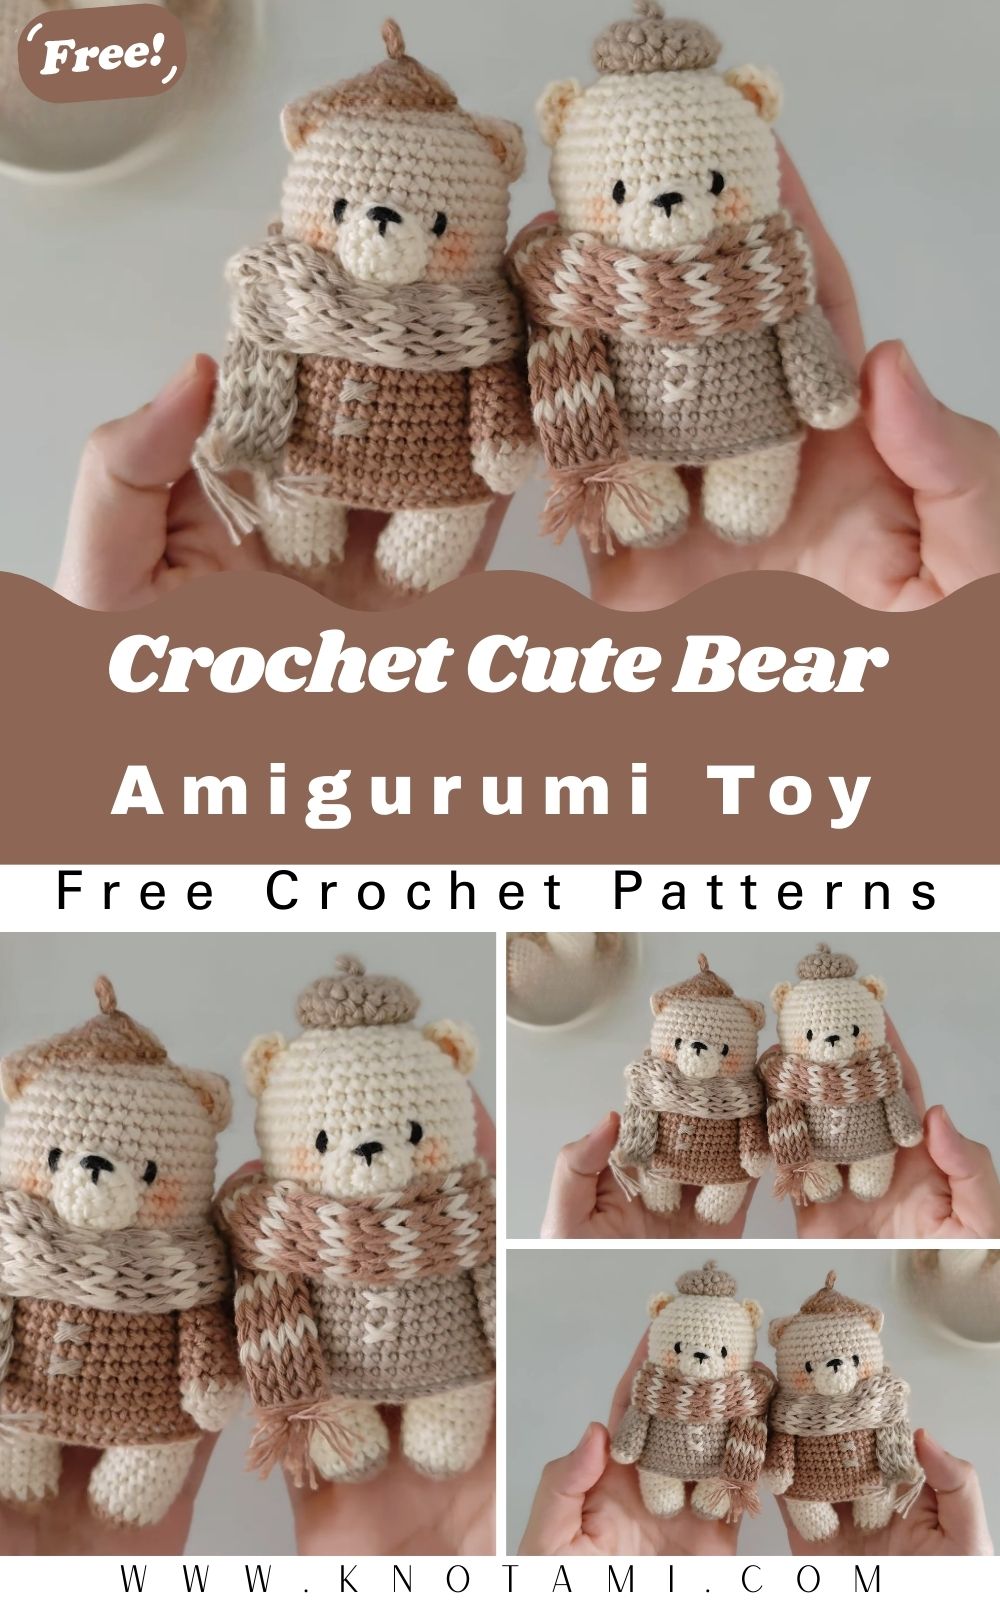
Soft beige-cream stitches shape a rounded head tiny ears and a snug little sweater in this cute crochet teddy bear amigurumi pattern. It’s made for a calm weekend project with a sweet finished result and a cozy scarf adds one more layer of charm.
Each piece comes together in a clear order from the head and body to a simple embroidered face, and finally the mini sweater and scarf. Beginners will find the limb shaping easy, and the neutral colors keep the bear looking timeless. It looks lovely on a shelf, in a gift basket, or tucked into a child’s stocking.
Project Overview
- Skill level: Beginner-friendly
- Pieces: Head, muzzle, 2 ears, body, 2 arms, 2 legs, sweater and scarf
- Time: About 3.5 to 4 hours. Plan roughly 45–55 minutes for the head, muzzle and ears, 25–30 minutes for the body, 35–40 minutes for the limbs, 30–40 minutes for the sweater and scarf, and 30–40 minutes for assembly.
Materials
- Yarn: Worsted weight (4) acrylic or cotton-acrylic blend in beige-cream for the bear. Tan, honey or light brown also work well.
- Contrast yarn: A small amount of ivory or white for the muzzle, plus one or two colors for the sweater and scarf
- Hook: 3.5 mm, a size down from the yarn label, so stuffing doesn’t peek through
- Stuffing: Polyester fiberfill (toy-safe)
- Eyes: One pair of 9 or 10 mm safety eyes with their locking backs, or black yarn to embroider
- Other: Stitch markers, yarn needle, pins, and black or dark brown yarn for the nose and mouth
Safety eyes or embroidery? Safety eyes give a neat, polished finish. For a child under 3, embroider the eyes instead, because safety eyes can become a choking hazard if they ever work loose. Embroidery also lets you adjust the eye spacing easily.
Abbreviations
- MR – magic ring
- sc – single crochet
- inc – increase (2 sc in one stitch)
- dec – invisible decrease
- sl st – slip stitch
- st(s) – stitch(es)
Before You Start
The whole bear is single crochet in continuous spiral rounds, with no joining or turning. Practice the invisible decrease first, because a standard decrease leaves little bumps on a round head.
Keep your stitches tight. If you can see stuffing through the fabric, drop half a hook size. Place a marker in the first stitch of every round and move it up as you go. A lost marker is the most common reason amigurumi ends up lopsided.
Watch the Video Tutorial
The video walks through every piece, including the exact stitch counts, the sweater and the scarf. Keep it open as you follow the steps below.
Step-by-Step Teddy Bear Pattern
Step 1: Head
- Start: MR, 6 sc (6).
- Increase: inc in each st (12), then keep adding 6 stitches per round until you reach the head size shown in the video, usually somewhere between 36 and 42 stitches.
- Height: Work even rounds (no increases) to build the height of the head, usually 8–10 rounds.
- Eyes: Before decreasing, insert the safety eyes in the middle of the even rounds, the same number of stitches from the center front on each side. Leave room below them for the muzzle. Lock the backs from inside.
- Close: Decrease each round, stuffing firmly as the opening narrows, then close the hole neatly.
Size check: After the increase rounds, the head should measure about 3.5 to 4 inches across. If it’s noticeably smaller, your tension is tight. That’s fine for durability, but go up a little in hook size if you want a bigger bear.
Step 2: Muzzle
The muzzle is where beginners most often go wrong, and it’s almost always about placement, not stitching.
- Crochet it: With ivory yarn, MR, 6 sc (6), inc in each st (12), then sc even for 2–3 rounds. Fasten off with a long tail.
- Place it low: Pin the muzzle in the lower-center third of the face, just below the eyes, not in the middle of the head. There should be room above it for the eyes and forehead.
- Check symmetry: Hold the head up and look at it straight on. The muzzle should be perfectly centered left to right.
- Sew it on: Stuff it lightly, a little softer than the head, and sew it on with the tail. An overstuffed muzzle looks like a ball glued to the face.
Step 3: Embroider the Nose and Mouth
With black or dark brown yarn, embroider a small triangle or oval nose at the front of the muzzle. Bring the needle down in a short vertical stitch, then add a small curved smile. Keep the mouth short and simple, because an oversized mouth makes the bear look cartoonish. If you didn’t use safety eyes, embroider the eyes now too.
Step 4: Ears (make 2)
MR, 6 sc (6), inc in each st (12), sc 1 round even. Fasten off with a long tail. Don’t stuff. Press each ear flat before sewing, so it becomes the classic rounded-but-flat teddy ear.
Pin the ears on the upper sides of the head, a little above eye level and angled slightly forward. Ears sewn right on top look more like a mouse, and ears set too far apart lose the compact teddy look.
Step 5: Body
- MR, 6 sc (6), then add 6 stitches per round until you reach about 30–36 stitches.
- Work 6–7 rounds even.
- Decrease gradually over 3–4 rounds to narrow toward the neck.
- Stuff firmly and close.
Step 6: Arms (make 2)
- MR, 6 sc (6), inc in each st (12), then sc even for 6–7 rounds.
- Lightly stuff the paw end, and leave the top few rounds unstuffed and flattened so the arm sits neatly against the body.
- Fasten off with a long tail.
Step 7: Legs (make 2)
- MR, 6 sc (6), inc in each st (12), then sc even for 7–8 rounds.
- Stuff firmly all the way, so the bear can sit without its legs collapsing.
- Fasten off with a long tail.
Step 8: Assemble the Bear
- Sew the head centered on top of the body.
- Sew an arm on each side, just below the neck, angled slightly down and inward. Arms sticking straight out look stiff.
- Pin the legs to the front of the lower body, angled slightly forward. Sit the bear on a table to test its balance before sewing them in place.
- Weave all tails through several stitches in different directions before trimming, so they don’t work loose with handling.
Step 9: Sweater and Scarf
Sweater: In your sweater color, the sweater is worked as a short tube that fits snugly around the bear’s body, with openings for the arms. Follow the video for the exact stitch counts, and try it on the bear as you go so it isn’t too loose or too tight.
Scarf: Chain a length that wraps once around the neck with tails left over. Work sc back along the chain, and add a second row if you want a wider scarf. Knot a few short strands of yarn into each end for fringe. Wrap it around the neck and tack it with a stitch so it stays put.
Stuffing Tips
Add stuffing a little at a time rather than all at once, which keeps each piece round and smooth. For a soft, huggable bear, stuff firmly but leave a little give. For a bear that holds a sitting pose, stuff the legs and lower body extra firmly.
Common Mistakes
- Muzzle too high: The bear looks flat-faced. Keep it in the lower-center third of the face.
- Ears on top or too far apart: The bear starts to look like another animal. Keep them on the upper sides, angled slightly forward.
- Overstuffed muzzle: It looks like an add-on ball instead of part of the face.
- Safety eyes added after closing the head: The backs can’t be locked from outside.
- No sit-test: The bear tips over. Always test the balance before sewing the legs.
Troubleshooting
- The bear looks lopsided: Usually the head is stuffed unevenly, or the eyes and ears were placed without a symmetry check. Re-pin before sewing anything permanently.
- The muzzle looks flat: It needs a little more stuffing, or it was sewn too flat against the head. Sew it with a slight dome.
- The bear won’t sit up: The legs are sewn straight down instead of slightly forward, or they’re understuffed.
Size and Color Ideas
For a bigger bear, use bulky yarn with a larger hook and the same rounds, keeping the stitches tight. For a smaller one, use DK or sport weight yarn with a smaller hook. Changing the yarn keeps the proportions right, while cutting stitch counts distorts the head-to-body ratio.
Beige and honey tan are classic, but the bear also looks lovely in dusty rose or sage green, or with a cream muzzle on a darker body for a modern nursery look.
Teddy Bear Gifts for Every Milestone
A little bear in a sweater fits almost any special moment. Change the sweater and scarf, and it’s ready for the occasion.
- New baby: Use a soft pastel sweater, and embroider the baby’s initial on the chest.
- First birthday: Add a tiny number “1” in felt or embroidery on the sweater.
- Graduation: Use school colors for the scarf, and tie a small rolled paper “diploma” with ribbon under one arm.
- Get well soon: Choose a warm, cheerful sweater color and add a handwritten tag around the neck.
- Christmas: Go for a red sweater with a white scarf, perfect for a stocking.
- Valentine’s Day: Sew a small crochet heart into the bear’s paws.
For another bear style, try the crochet bear teddy amigurumi. The heart doll amigurumi makes a sweet Valentine’s partner for your bear, and the penguin amigurumi and balloon dog round out a lovely toy shelf.
Care Instructions
Spot clean with a damp cloth. For a full wash, hand wash in cool water, reshape the bear while it’s damp and lay it flat to dry, so the stuffing doesn’t shift or clump.
FAQs
How do I keep the face symmetrical?
Pin the eyes, muzzle and ears in place first, and look at the bear straight on before sewing anything permanently.
Can I make this bear without safety eyes?
Yes. Embroider the eyes with black yarn instead. This is also the safer choice for children under 3.
Do I have to make the sweater and scarf?
No. The bear looks sweet on its own, but the sweater and scarf are what give this pattern its cozy look.
A Bear Worth Holding Onto
A well-placed muzzle, ears in the right spot and a snug little sweater are what turn a few round pieces into a real teddy. This is the kind of toy that gets carried everywhere, so take your time with the finishing. Years from now, it may still be someone’s favorite.